Amps, Volts, and Watts:
Before we get into reading and understanding the remote, I want to give you a little bit of information about 3 electrical terms, specifically amps, volts, and watts. These are the values that you will see on your screen. I am not going to go too far in depth explaining them, I will just tell you the bare minimum you need to know about them in the context of understanding your solar sytem.
Volts: Volts is a measure of electrical force. I like to think about it as how hard the electricity is "pushing". When your batteries have low voltage, they don't have enough force to make your appliances work and as a result lights will dim and fans will turn slow down. All you need to understand about Volts right now is that 0-100% on your batteries is roughly between 11.5V-13.8V and are charged at up to 14.4V. Each of the groups or stages of solar panels on the roof of your trailer will also output a certain amount of voltage (~40V or ~20V) that depends on the amount of sun they are receiving in that moment.
Amps: Amps (short for Amperage) is the flow of electricity. The higher the amps, the more electricity is flowing at once.
Watts: Watts is a measurement of power. It is made up of Volts x Amps, so when you see on your solar remote that you are getting 800W from the roof, that means that you're getting volts and amps.
Parts of the Solar System
Understanding what parts and pieces make up your solar system goes a long way towards demystifying it. In reality there are only 3 parts in your solar system:
- The Solar panels: Convert light into electricity
- The MPPT Solar Controllers: These guys are the translators. They take the energy that the solar panels send and use it to safely charge the batteries. On a more technical level, the batteries want to be charged at around 14V, but the solar panels output up to 40V. The solar controller converts volts to amps without losing power.
- The batteries: These guys provide power to everything in the trailer.
All other parts behave independently of the solar system; these 3 parts are the only things that regulate the power that is sent to the batteries.
You may or may not know that the solar on your ROAMER 1 is the 3rd and final stage of electrical upgrades for the solar panels on the roof. You have 11 panels rated for a total of 1240 Watts on the roof of your ROAMER 1 trailer. Those panels are split into 3 different groups (the stages that I previously mentioned). The diagram below gives a visual representation of the parts in your solar system.

Solar Controller Remote Manual:
"What the heck am I looking at?"
You have 11 different solar panels up on the roof, 3 different solar controller under the bed, and you have 3 different remotes above the door. What is going on? It all seems really complicated and complex. Luckily, in order to figure out what is going on with our solar system, we just have to understand what we are looking at when we see the solar remote. This article is going to teach you how to read and understand your solar controller.
Reading the solar Controller
Below is a quick view of the values we see on the solar remote and what they mean
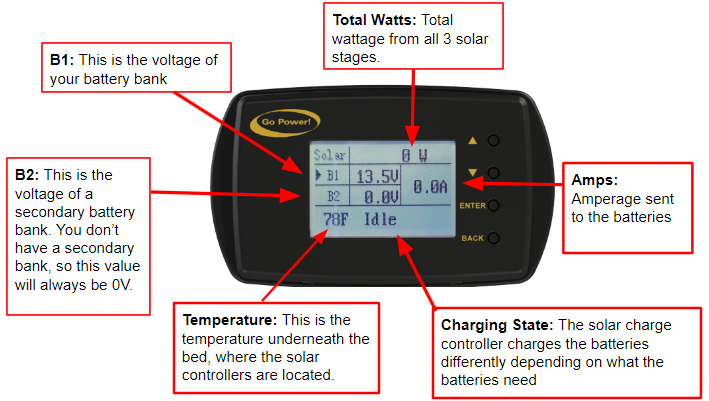
Let's focus on the Top row that is labeled 'Solar':
Here we see the Watts that we have coming from our solar panels. This is the most important number on your solar controller. We can tell a lot about our solar system just by looking at the Watts on the solar controller.
This number here is determined by a few factors:
- The power that is in your battery bank
- Solar panel efficiency. All solar panels ever are over-rated, doesn't matter what trailer they come on or who manufactured the panels. The solar panels on the ROAMER 1 have about 75% of rated capacity coming in during peak hours which is pretty great(we've seen as low as 50% of rated capacity for lower quality panels). Later we'll talk more about what this means when it comes to actual numbers.
- The conditions that your solar panels are exposed to. Ambient temperature, angle of the sun/time of day, and the cleanliness of the panels are 3 of the biggest determining factors when it comes to the total potential output of your solar panel array.
Below are a few different scenarios and what you might expect to see. Like I said above, the power that is in your battery bank is a big determining factor. This is because your solar system is smart! It can moderate the amount of power that it sends to the batteries based off of how much power is in your batteries. If your batteries are at 100%, it won't send much power at all to your batteries and the number of Watts at the top of the remote will be diminished.
Perfect conditions: 800-900W.
The sun is right above you, your panels are clean, the birds are singing, and you aren't at 100% battery capacity. 800-900W is the best that you will see. Maybe a little bit more and maybe a little bit less. You'll likely see this around noon-3pm. This is the 75% of rated capacity that I breifly touched on above.
Normal conditions: 500-600W.
Maybe it is just a little bit earlier or a little bit later in the day. The panels aren't too dirty, but aren't completely spotless. This is what you'll expect to see when the batteries still need some charge.
Poor conditions: 100-200W.
We've seen this range in overcast and rainy weather. This is actually an impressive sign! The fact that you can get 100-200W out when the sun is hiding behind a layer of clouds is incredible! Go ROAMER 1! You'll see a little bit less than this or close to this amount in another scenario. If your batteries are at 100%, you will see a number in this range or lower.
Of course there is all a spectrum. If you pay close enough attention, you'll see a little bit more or a little bit less here and there depending on where you are and what conditions your trailer is exposed to.
Amps:
The amps that we see on the right hand of the screen is directly proportional to the watts that we see on the top of the screen. This is the rate at which power is flowing to your batteries. The more Watts at the top of the screen, the more power we send to your batteries on once.
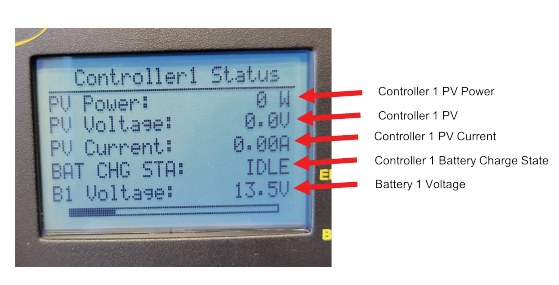
The diagram above illustrates how the 1240W of solar panels are grouped. The number at the top of the remote is the total wattage from the 3 groups of solar panels on the roof. We can see what each of the groups are outputting individually. You can do this by pressing and holding the 'Enter' button on the remote until the screen changes. Once the screen has changed, press the down arrow until you see a screen that resembles the following:
[CONTROLLER 1 STATUS]
[CONTROLLER 2 STATUS]
[CONTROLLER 3 STATUS]
If you click on controller 1, you'll see what is going on in stage 1 solar. You can monitor stage 1 solar individually. The same is true for stages 2 and 3. This is what you'll see when you go into Controller 1. Ass you can see, the first 3 values show you the Watts, Volts, and Amps coming from the solar panels.The 4th value tells you what charging state the controller is in.
Let's review just a little bit of what we've learned. The ROAMER 1 has 11 panels that are rated for a total of 1240W. The 1240W are grouped into 3 different groups called stages. The stages are regulated by the solar controllers, which take the electricity coming from its respective group of solar panels and use it to charge the batteries appropriately. Our remote allows us to monitor each group of solar panels individually. The next obvious question is "What should we see when looking here?"
Like I've said a few times, what you see largely depends on the ambient conditions (sun, cleanliness etc), which can make it difficult to create a blanket rule for what we want to see when we look at the controllers on an individual level. I can give you 1 quick guideline that can help you assess that particular solar stage. My recommendation is to look at PV Volts. Below are suggestions for a general range of PV Voltage you should see when looking at each of the controllers in good ambient conditions regardless of the charge of the batteries.
Controller 1 - Stage 1 - PV Volts: 16-20V
Controller 2 - Stage 2 - PV Volts: 36-40V
Controller 3 - Stage 3 - PV Volts 36-40V.
Seeing something lower than the small range listed above will indicate an issue whether that is partial shading, dirty panels or something else.
Cleaning the solar panels:
The manufacturer of the solar panels (Go Power) recommends you should clean the solar panels at least once a month. According to Go Power, cleaning your solar panels once a month can result in up to 20% higher efficiency.
Go Power recommends using water or a gentle cleanser and a soft cloth to clean the solar panels and advises against using any kind of abrasive cleaner since those can damage the solar panels.